Inspection Fields
The Inspection tab contains some general information fields, as well as Comments and Observations.
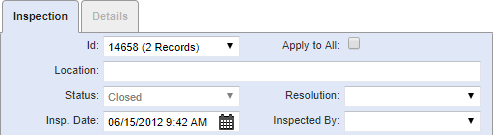
- Id: This field automatically populates with the ID of the inspection. If you have more than one inspection open, use the Id drop-down list to select other inspections to view.
- Apply to All: Select this check box to apply changes to all inspections listed in the Id field when two or more inspections are open.
-
Location: Enter location details relevant to the inspection.
 NOTE: If the asset being attached has the Location field populated in the GIS, the location automatically populates.
- Status: Select the status of the inspection. This field may automatically populate with the current status of the inspection.
- Resolution: Select the final outcome of the inspection. These are defined in Designer under Preferences > Inspection.
- Insp. Date: Enter the date of the inspection or use the calendar icon to select it.
- Inspected By: Select the name of the person who closed the inspection.
NOTE: The Inspection Date and Inspected By fields must be populated before a condition score is calculated. Condition scores are only calculated for linear inspections that have Calc. Condition Score selected on the inspection template and for individual inspection observations that have Calc. Condition Score selected. Any unanswered observations are not included in the Condition Score calculation. See Add or Edit a Custom Inspection Template and Configure Linear Observations in the Designer for 15.8 Guide for more information.
If you are viewing an inspection with a QA Model of Linear, the Observations section shows next. Observations are for gathering and tracking any observations about an asset. If you are viewing an inspection with a QA Model of Branch, the Observations show in a separate panel to the right. This panel is customizable, so it varies depending on how the administrator has set it up in Designer under Inspections > Templates.

- Observation: Enter any observations made.
- Repairs: Enter any repairs made to the asset.
- Recommendation: Enter any recommendations regarding the asset.
The Details tab contains general information about the inspection, as well as Location, Map Layer Fields, Entity, Work Cycle, Related Work Activities, Inspections, and Attachments. Fields may automatically populate if the administrator has set it up to do so.
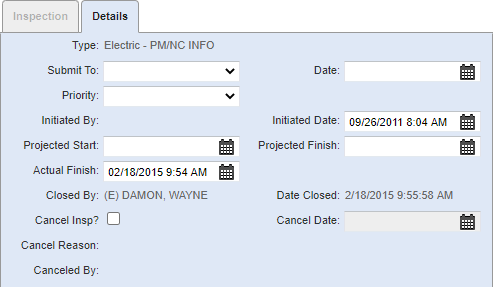
- Type: This field automatically populates with the inspection type.
- Submit To: Select the person who the inspection is submitted to.
- Date: Enter the date that the inspection is submitted or select it using the calendar.
- Priority: Select the priority of the inspection.
-
Initiated By: This field automatically populates with the login ID of the person who initiated the inspection.
-
Initiated Date: This field automatically populates with today's date
-
Projected Start: Enter the date the inspection is projected to begin. This date automatically populates, but can be changed.
-
Projected Finish: Enter the date the inspection is projected to be finished or select it using the calendar. This field may automatically populate if the administrator has configured a duration on the template.
-
Actual Finish: Enter the date the inspection is completed or select it using the calendar. If you close the inspection without entering a date, it populates with the current date and time. This is a required field.
- Closed By: This field automatically populates with the name of the person who closed the inspection.
-
Date Closed: This field automatically populates with the date the inspection was closed.
- Cancel Insp?: Select to cancel the inspection.
-
Cancel Date:
- Cancel Reason: Enter the reason the inspection was canceled.
- Canceled By: This field automatically populates with the login ID of the person who canceled the inspection and cannot be changed.
Below these fields is the Location section, which contains information about the location of the inspection.
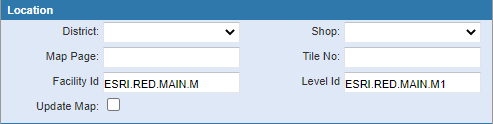
- District: Select the district.
- Shop: Select the shop.
- Map Page: Enter the map page.
- Tile No: Enter the tile number.
-
Facility Id: This is the Facility Id for the building where the asset is located. This field automatically populates if an asset is attached to the work activity. This corresponds with the facility and level IDs set up for assets in the geodatabase. See
-
Level Id: This is the Level Id for the floor where the asset is located. This field automatically populates if an asset is attached to the work activity. This corresponds with the facility and level IDs set up for assets in the geodatabase. See
- Update Map: This field can be used as a flag for whatever purpose your organization wishes. For example, it could be used for instances when the map or GIS need to be updated. The administrator can search for inspections that have this field selected by selecting Yes from the Update Map search field. If desired, the field name can be changed by editing the corresponding XML file.
The Map Layer Fields section contains any information provided about the map layer.
- Reset: If changes have been made, click to refresh the map layer data.
The Entity section contains information about the asset associated to the inspection.
NOTE: Each asset type has a unique form to edit attribute information, so the asset attached to the inspection may not have a form identical to the example below. See Add an Asset Type in the Designer for 15.8 Guide for more information.
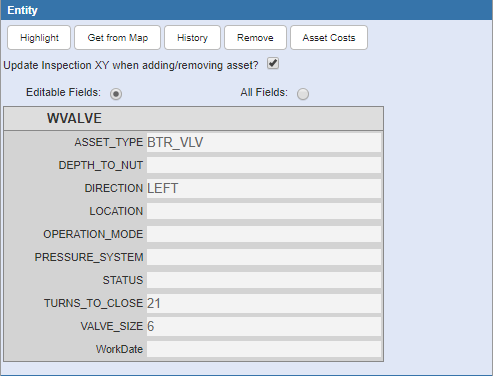
- Highlight: Click to highlight the selected asset on the map.
- Get from Map: Click to attach an asset selected on the map.
- History: Click to view all work activities previously performed on the asset.
- Remove: Click to remove the asset from the inspection.
- Asset Costs: Click to view life cycle costs associated with the asset.
- Update Inspection XY when adding/removing asset?: Select to update the X and Y coordinates of the inspection when an asset is added or removed.
- Editable Fields: Select to view only the editable fields for the asset. Select All Fields to view all the fields for the asset. The editable fields are configured by the administrator. See Configure Editable Asset Fields for a Custom Inspection Template in the Designer for 15.8 Guide for more information.
- All Fields: Select to view all of the attribute fields for the asset that have been set as visible for the asset type.
The Work Cycle section allows you to schedule future, recurring inspections. See Create a Cyclical Inspection for more information.
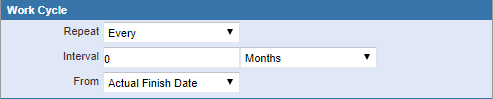
- Repeat: Select how often to repeat the inspection. If you do not want to schedule future inspections, select Never.
- Interval: Enter a number for the interval and select Days, Weeks, Months, or Years from the drop-down list.
- From: Select a date from which future inspections are scheduled.
The following fields are found on the Readings panel.

- Delete: Click to delete the selected reading.
- WO Reading: Enter a reading for the asset selected.
- Update WO Reading: Click to update the selected reading.
The following fields are found on the Details panel.

- Reading: Enter a reading.
- Comments: Enter any comments about the reading.
- Save: Click to save the details.

